Metallic effect
Metallic effect
Hello wizards,
I am trying to make an metallic effect for borders and some text.
I found this tutorial for gimp, but could not find anything for IM. Can something like this be made by IM?
Thanks,
I am trying to make an metallic effect for borders and some text.
I found this tutorial for gimp, but could not find anything for IM. Can something like this be made by IM?
Thanks,
- GreenKoopa
- Posts: 457
- Joined: 2010-11-04T17:24:08-07:00
- Authentication code: 8675308
Re: Metallic effect
Step 8, the bump map, is the only potential hang-up. Gimp's documentation describes it here. Hopefully someone has an easy answer for this narrower problem.

Steps 1-4 are single operations. Steps 5-7 are a little harder but not bad. Step 9 may best be done by using Gimp, then creating a clut (color look-up table) for use with IM.

Steps 1-4 are single operations. Steps 5-7 are a little harder but not bad. Step 9 may best be done by using Gimp, then creating a clut (color look-up table) for use with IM.
-
snibgo
- Posts: 12159
- Joined: 2010-01-23T23:01:33-07:00
- Authentication code: 1151
- Location: England, UK
Re: Metallic effect
For the bumpmap, I would use "-shade".
For step 9, I would create a clut with "-function Sinusoid" at its heart. Eg:
Adjust the gammas as desired.
EDIT: It needs negating before use.
For step 9, I would create a clut with "-function Sinusoid" at its heart. Eg:
Code: Select all
convert ^
  -size 1x1000 gradient: ^
  -gamma 0.9 ^
  -function Sinusoid 2.25,0,0.5,0.5 ^
  ( gradient: -gamma 1 ) ^
  +swap ^
  -compose Overlay -composite ^
metallic_clut.pngEDIT: It needs negating before use.
Last edited by snibgo on 2013-08-13T10:42:21-07:00, edited 1 time in total.
snibgo's IM pages: im.snibgo.com
- fmw42
- Posts: 25562
- Joined: 2007-07-02T17:14:51-07:00
- Authentication code: 1152
- Location: Sunnyvale, California, USA
Re: Metallic effect
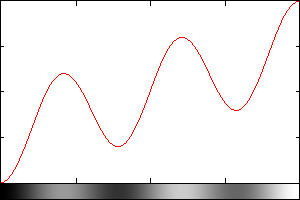
Are you on Linux/Mac or Window? If Linux/Mac, then you can use my script chrome (see below) to achieve that. The key is to create a lookup table like the one in the GIMP example that has several rising bumps. You can do that with my script curves to get the same kind of curve as in GIMP if you know the values. Otherwise, in Windows, you would have to create the look-up table using -fx from some formula that replicates something similar. Once you have the lookup table as a 1D image, you can them apply it to your image using -clut.
In my script chrome, I created the lookup table via -function sinusoid
Here is the core code
Input:

Create LUT:
amp1=0.5; amp2=0.5; cyc=2.5
convert \( -size 1x100 gradient: -rotate 90 \) \
\( -clone 0 -function sinusoid $cyc,-90,0.5,0.5 \) \
\( -clone 1 -evaluate multiply $amp1 \) \
\( -clone 0 -evaluate multiply $amp2 \) \
-delete 0,1 -compose plus -composite \
lut.png
Profile of LUT:

Process Image:
convert binaryimage.gif -colorspace gray -blur 0x3 \
-shade 135x45 -auto-level lut.png -clut binaryimage_result.png

For Windows users, leave off all \ and put ^ at the end of each line where the trailing \ is located. See
http://www.imagemagick.org/Usage/windows/
EDIT:
With a slight modification of the Process step (as simplified from my chrome script at my link below), you can add color and a transparent background.
Color only:
color="lightblue"
convert binaryimage.gif -colorspace gray -blur 0x3 \
-shade 135x45 -auto-level lut.png -clut +level-colors black,${color} \
binaryimage_result3.png

Color and Transparency:
color="lightblue"
convert binaryimage.gif -colorspace gray -blur 0x3 \
-shade 135x45 -auto-level lut.png -clut +level-colors black,${color} \
-fuzz 5% -fill none -draw "color 0,0 floodfill" binaryimage_result2.png

Though masking would produce a better transparent result.
See snibgo's more complete solution below (though I believe it could be made faster by using -blur rather than -gaussian-blur with little visible effect).
In my script chrome, I created the lookup table via -function sinusoid
Here is the core code
Input:

Create LUT:
amp1=0.5; amp2=0.5; cyc=2.5
convert \( -size 1x100 gradient: -rotate 90 \) \
\( -clone 0 -function sinusoid $cyc,-90,0.5,0.5 \) \
\( -clone 1 -evaluate multiply $amp1 \) \
\( -clone 0 -evaluate multiply $amp2 \) \
-delete 0,1 -compose plus -composite \
lut.png
Profile of LUT:

Process Image:
convert binaryimage.gif -colorspace gray -blur 0x3 \
-shade 135x45 -auto-level lut.png -clut binaryimage_result.png

For Windows users, leave off all \ and put ^ at the end of each line where the trailing \ is located. See
http://www.imagemagick.org/Usage/windows/
EDIT:
With a slight modification of the Process step (as simplified from my chrome script at my link below), you can add color and a transparent background.
Color only:
color="lightblue"
convert binaryimage.gif -colorspace gray -blur 0x3 \
-shade 135x45 -auto-level lut.png -clut +level-colors black,${color} \
binaryimage_result3.png

Color and Transparency:
color="lightblue"
convert binaryimage.gif -colorspace gray -blur 0x3 \
-shade 135x45 -auto-level lut.png -clut +level-colors black,${color} \
-fuzz 5% -fill none -draw "color 0,0 floodfill" binaryimage_result2.png

Though masking would produce a better transparent result.
See snibgo's more complete solution below (though I believe it could be made faster by using -blur rather than -gaussian-blur with little visible effect).
Last edited by fmw42 on 2013-08-13T13:46:40-07:00, edited 4 times in total.
-
snibgo
- Posts: 12159
- Joined: 2010-01-23T23:01:33-07:00
- Authentication code: 1151
- Location: England, UK
Re: Metallic effect
I like the difference the gradient makes in the Gimp version, so here is my solution. Windows script, with a shadow thrown in for free.
Loads of knobs that can be tweaked.

Code: Select all
%IM%convert ^
  -size 1x1000 gradient: ^
  -gamma 0.9 ^
  -function Sinusoid 2.25,0,0.5,0.5 ^
  ( gradient:rgb(100%%,100%%,80%%)-black -gamma 1 ) ^
  +swap ^
  -compose Overlay -composite ^
  -rotate 90 ^
  metallic_clut.png

%IM%convert ^
  -pointsize 160 -font Arial-Black label:" snibgo " ^
  -gaussian-blur 0x5 ^
  -level 40%%,60%% ^
  -gaussian-blur 0x3 ^
  -alpha off ^
  metallic_a.png

FOR /F "usebackq" %%L IN (`%IM%identify -format "WW=%%w\nHH=%%h" metallic_a.png`) DO set %%L

%IM%convert ^
  -size %WW%x%HH% ^
  gradient:rgb(100%%,100%%,100%%)-black ^
  ( metallic_a.png -negate ) ^
  -compose CopyOpacity -composite ^
  ( metallic_a.png ^
    ( +clone -negate -level 0%%x10%% ) ^
    -compose CopyOpacity -composite ^
    -shade 315x45 -auto-gamma -auto-level ^
  ) ^
  -compose Overlay -composite ^
  metallic_clut.png -clut ^
  ( +clone -background rgb(0,0,75%%) -shadow 80x2+3+3 -write metallic_shad.png ) ^
  +swap ^
  -compose Over -composite ^
  -trim +repage ^
  mags.png
snibgo's IM pages: im.snibgo.com
Re: Metallic effect
Thanks!
Lots of great suggestions.
snibgo, I am somewhat confused by your FOR loop with the "usebackq". I guess this is only to set the %WW% and %HH% variables?
Lots of great suggestions.
snibgo, I am somewhat confused by your FOR loop with the "usebackq". I guess this is only to set the %WW% and %HH% variables?
-
snibgo
- Posts: 12159
- Joined: 2010-01-23T23:01:33-07:00
- Authentication code: 1151
- Location: England, UK
Re: Metallic effect
Yes, exactly. A Unix command would be different, of course.
My script needs to know the width and height to create the "gradient:rgb(100%%,100%%,100%%)-black". There may be a way of doing it without WW and HH but I can't think of one.
"gradient:rgb(100%%,100%%,100%%)-black" means exactly the same as "gradient:" because white and black are the defaults, but it's fun to change the percentages.
If you already know the width and height, you won't need the FOR loop.
Another awkward point: "-shade 315x45" simulates light from the top-left, and "-shadow 80x2+3+3" puts the shadow bottom-right. If you want a different light direction, it's best to change both of these.
snibgo's IM pages: im.snibgo.com
Re: Metallic effect
You can do that on unix with
Your script works great when the image has only text and nothing else.
But when I have an image where other information is present (although removed by transparency), this other information is rendered instead of the desired text.
For example: I want to create a chrome border around a picture. So I draw a rectangle around the picture and set everything else to "none". But in your script, the contents become visible again in metallic_a.png.
Code: Select all
WW=`identify -format "%w" metallic_a.png`
HH=`identify -format "%h" metallic_a.png`
But when I have an image where other information is present (although removed by transparency), this other information is rendered instead of the desired text.
For example: I want to create a chrome border around a picture. So I draw a rectangle around the picture and set everything else to "none". But in your script, the contents become visible again in metallic_a.png.
-
snibgo
- Posts: 12159
- Joined: 2010-01-23T23:01:33-07:00
- Authentication code: 1151
- Location: England, UK
Re: Metallic effect
My script creates metallic_a.png with black letters on a white background, and no transparency. The black becomes metallic; the white becomes transparent. It works fine with other similar images, eg:
Code: Select all
%IM%convert ^
  -size 600x400 xc:Black ^
  -fill White -draw "rectangle 100,100 500,300" ^
  metallic_a.png
snibgo's IM pages: im.snibgo.com
-
snibgo
- Posts: 12159
- Joined: 2010-01-23T23:01:33-07:00
- Authentication code: 1151
- Location: England, UK
Re: Metallic effect
Agreed. I chose gaussian-blur simply because that was used in the Gimp example.fmw42 wrote:See snibgo's more complete solution below (though I believe it could be made faster by using -blur rather than -gaussian-blur with little visible effect).
My script includes "-write metallic_shad.png" towards the end. This is only for debugging, and should be removed.
Incidentally, my script renders the shadow as "rgb(0,0,75%%)", a darkish blue. This is useful as I can readily distinguish the shadow. For production use, a much darker blue or black may be preferred. It could be a parameter to the script, of course.
This makes a cool modernistic frame:
Code: Select all
%IM%convert ^
  -size 600x400 xc:White ^
  -fill Black -draw "rectangle 50,50 550,350" ^
  -blur 0x10 ^
  -fill White -draw "rectangle 100,100 500,300" ^
  -alpha off ^
  metallic_a.png
snibgo's IM pages: im.snibgo.com
-
snibgo
- Posts: 12159
- Joined: 2010-01-23T23:01:33-07:00
- Authentication code: 1151
- Location: England, UK
Re: Metallic effect
Correction to the shadow portion of my script:
Changing the offsets (the "+3+3" in "-shadow 80x2+3+3") had no effect. I thought I was being clever in using "-compose Over -composite" instead of the more usual "-compose Over -layers merge". But composite seems to ignore the given shadow offset and uses a constant +4+4. I don't know if this is an IM bug or IM feature or (more likely) a bug in my brain.
Anyhow, my shadow code ...
... should be replaced by ...
Now, we can change "+3+3" to "-10+20" or anything else.
Changing the offsets (the "+3+3" in "-shadow 80x2+3+3") had no effect. I thought I was being clever in using "-compose Over -composite" instead of the more usual "-compose Over -layers merge". But composite seems to ignore the given shadow offset and uses a constant +4+4. I don't know if this is an IM bug or IM feature or (more likely) a bug in my brain.
Anyhow, my shadow code ...
Code: Select all
( +clone -background rgb(0,0,75%%) -shadow 80x2+3+3 -write metallic_shad.png ) ^
+swap ^
-compose Over -composite ^Code: Select all
( +clone -background rgb(0,0,75%%) -shadow 80x2+3+3 ) ^
+swap ^
-background None -compose Over -layers merge ^snibgo's IM pages: im.snibgo.com
- fmw42
- Posts: 25562
- Joined: 2007-07-02T17:14:51-07:00
- Authentication code: 1152
- Location: Sunnyvale, California, USA
Re: Metallic effect
-composite will not expand the canvas for the offset, but -layers merge will
see
http://www.imagemagick.org/Usage/layers/#layers
see
http://www.imagemagick.org/Usage/layers/#layers
-
snibgo
- Posts: 12159
- Joined: 2010-01-23T23:01:33-07:00
- Authentication code: 1151
- Location: England, UK
Re: Metallic effect
Yes, I understand that. But it could apply an offset without expanding the canvas. Indeed, it does apply an offset, but a constant offset (apparently).
snibgo's IM pages: im.snibgo.com
- fmw42
- Posts: 25562
- Joined: 2007-07-02T17:14:51-07:00
- Authentication code: 1152
- Location: Sunnyvale, California, USA
Re: Metallic effect
If the shadow tapers off before it reaches the limits set by the offsets, then that could explain it. I believe the offsets just add to the canvas width and height. So if you increase the sigma, then you should see differences with different offsets.
-
snibgo
- Posts: 12159
- Joined: 2010-01-23T23:01:33-07:00
- Authentication code: 1151
- Location: England, UK
Re: Metallic effect
I've created a bug report: viewtopic.php?f=3&t=23912
Another thought: for realism, the gradient can be rotated to follow "-shade" and "shadow". This is simple scripting, so I'll leave it as an exercise for the reader.
Another thought: for realism, the gradient can be rotated to follow "-shade" and "shadow". This is simple scripting, so I'll leave it as an exercise for the reader.
snibgo's IM pages: im.snibgo.com