PAID : Help removing edge anti-aliasing when increasing canvas size
Hi expert members,
I am using the Windows distribution and calling the convert exe to perform a number of operations on PNG images summarised as follows:
1. Size to a pre-specified size, maintaining aspect ratio
2. When the canvas increases, set the new parts of the background to 100% transparent
3. Add a border around the image of 10% transparent
4. Input & output images (SrcImg & TgtImg) are PNG
This is the command with dimensions fixed to 100x100:
convert -matte -bordercolor none -border "10%" -resize "100x100>" -background none -compose copy -gravity center -extent "100x100" -quality "100" SrcImg TgtImg
The source images are actually exported programmatically from PowerPoint as PNG files whilst those images within a presentation may be transparent PNG files or flattened JPG files.
An issue occurs whereby an antialias border of pixels appears around the original image if the original source in PowerPoint is a non-transparent JPG. Let's say I have a source image of 50x50px, when the convert command is run, the final image ends up at the target 100x100px with a transparent background as expected but there is a square outline of pixels, 1px wide around the original 50x50px image where IM appears to be trying to blend the outer edge of the image into the new canvas size transparent background. Normally this wouldn't be an issue but the this "invisible" border is actually being rendered in its final destination as a very visible grey border. The example below shows two images, the first was created by exporting a JPG version of the image from PowerPoint and applying the above command (with different dimensions) and the one on the right created in the same way except the source image in PowerPoint was a transparent PNG (transparent outside of the blue circle).
So, is there a way to prevent IM applying anti-aliasing in this case?
As this is a commercial project, I'm happy to pay for the answer.


-
- Posts: 12159
- Joined: 2010-01-23T23:01:33-07:00
- Authentication code: 1151
- Location: England, UK
Re: PAID : Help removing edge anti-aliasing when increasing canvas size
The first steps are:
1. Tell us which version of IM you are using, on what platform.
2. Re-write the command in the proper order: read the input, then do the operations, then write the output, eg
3. Show us the input and output as separate images. When you combine them into one, we can't try commands on the input.
Because you don't have the input file until the end, I don't know what order your commands are executed in, but it probably adds the border before the resize.
1. Tell us which version of IM you are using, on what platform.
2. Re-write the command in the proper order: read the input, then do the operations, then write the output, eg
Code: Select all
convert SrcImg -matte -bordercolor none -border "10%" -resize "100x100>" -background none -compose copy -gravity center -extent "100x100" -quality "100" TgtImg
Because you don't have the input file until the end, I don't know what order your commands are executed in, but it probably adds the border before the resize.
snibgo's IM pages: im.snibgo.com
Re: PAID : Help removing edge anti-aliasing when increasing canvas size
What is the -compose copy supposed to be doing in there?
-
- Posts: 12159
- Joined: 2010-01-23T23:01:33-07:00
- Authentication code: 1151
- Location: England, UK
Re: PAID : Help removing edge anti-aliasing when increasing canvas size
"-border" uses the current "-compose" setting so, depending on the order of execution, it might have an effect.
When the input file is first, its proper place, as I have shown it, "-compose" has no effect.
snibgo's IM pages: im.snibgo.com
Re: PAID : Help removing edge anti-aliasing when increasing canvas size
Thank you for the information snibgo
- fmw42
- Posts: 25562
- Joined: 2007-07-02T17:14:51-07:00
- Authentication code: 1152
- Location: Sunnyvale, California, USA
Re: PAID : Help removing edge anti-aliasing when increasing canvas size
Not sure I fully understand your problem without seeing the actual source file.
But if you are adding a transparent border to a JPG and then resizing and saving as JPG, you will get a black border, since JPG does not support transparency. It therefore turns off the transparency, leaving the black underlying border around.
Re: PAID : Help removing edge anti-aliasing when increasing canvas size
Good morning experts. Thank you all for the replies. I have uploaded some test images as follows:
1. PPT-2000x2000-PNG.png = Programmatic export of the PNG version of the logo from PowerPoint to a PNG file = source 1 for ImageMagick
2. PPT-2000x2000-JPG.png = Programmatic export of the JPG version of the logo from PowerPoint to a PNG file = source 2 for ImageMagick
3. IM-2000x2000-PNG.png = Output 1 from ImageMagick of source image 1 above
4. IM-2000x2000-JPG.png = Output 2 from ImageMagick of source image 2 above - note the semi-transparent artefact I'm trying to avoid around the original border of the circle, starting at the top left corner at coord 48,10. Normally this wouldn't be an issue but for some reason, Microsoft Office is incorrectly rendering that 1px wide semi-transparent border as a grey outline when loaded into a fluent ribbon gallery control (see my original screenshot above).
I see some other questions relating to the command line structure and as I developed this a long time ago, I can't recall why all of the various elements are there!
Regarding version and platform:
ImageMagick-6.9.1-Q16-x64-dll.exe
Windows 7 x64
Last edited by JamieG on 2016-05-26T01:54:34-07:00, edited 1 time in total.
Re: PAID : Help removing edge anti-aliasing when increasing canvas size
Doh! I've no idea why that order has been specified in the code but thanks for the help. I'll go and do that now...snibgo wrote: 2. Re-write the command in the proper order: read the input, then do the operations, then write the output, egCode: Select all
convert SrcImg -matte -bordercolor none -border "10%" -resize "100x100>" -background none -compose copy -gravity center -extent "100x100" -quality "100" TgtImg
Re: PAID : Help removing edge anti-aliasing when increasing canvas size
The undesired effect occurs when processing a PNG source image (exported from a JPG image within PowerPoint to a PNG image) to a target PNG image. To summarise: (4 x images added above)fmw42 wrote:Not sure I fully understand your problem without seeing the actual source file.
But if you are adding a transparent border to a JPG and then resizing and saving as JPG, you will get a black border, since JPG does not support transparency. It therefore turns off the transparency, leaving the black underlying border around.
PPT : JPG image on a slide is exported programmatically as a PNG to the Windows file system
IM : PNG image from above is processed which is adding a 1px wide anti-aliasing border around the original image
PPT : PNG image created by IM is imported into the Fluent ribbon UI as a gallery item and is rendered with a grey outline around the original JPG image boundary (as shown in my original image in this post).
- fmw42
- Posts: 25562
- Joined: 2007-07-02T17:14:51-07:00
- Authentication code: 1152
- Location: Sunnyvale, California, USA
Re: PAID : Help removing edge anti-aliasing when increasing canvas size
If the problem is that the alpha channel is grayscale (for the anti-aliasing), then make the alpha channel binary. See if this helps.
or
If on IM 7, replace convert with magick
Code: Select all
convert IM-2000x2000-JPG.png -channel alpha -threshold 50% +channel IM-2000x2000-JPG2.png
Code: Select all
convert IM-2000x2000-JPG.png -channel alpha -threshold 0 +channel IM-2000x2000-JPG3.png
Re: PAID : Help removing edge anti-aliasing when increasing canvas size
Thanks fmw42. That certainly gets rid of the unwanted grey border from the JPG image exported from PowerPoint as a PNG. It does however degrade the PNG image exported from PowerPoint as PNG (introducing jaggies around the logo outer circle) and also has unwanted side effects on other images (that I've not included so far) where grayscale transparency exists within the image boundary. I need to sleep on this (I'm in the UK and it's late)...fmw42 wrote:If the problem is that the alpha channel is grayscale (for the anti-aliasing), then make the alpha channel binary. See if this helps.
orCode: Select all
convert IM-2000x2000-JPG.png -channel alpha -threshold 50% +channel IM-2000x2000-JPG2.png
If on IM 7, replace convert with magickCode: Select all
convert IM-2000x2000-JPG.png -channel alpha -threshold 0 +channel IM-2000x2000-JPG3.png
- fmw42
- Posts: 25562
- Joined: 2007-07-02T17:14:51-07:00
- Authentication code: 1152
- Location: Sunnyvale, California, USA
Re: PAID : Help removing edge anti-aliasing when increasing canvas size
Try this:
Does that help? Do you need the extra transparency outside the main part of the image or would trimming it be adequate?
Post examples of one of the other images that has issues.
Code: Select all
convert IM-2000x2000-JPG.png -trim -background white -flatten -compose over -background none IM-2000x2000-JPG5.png
Post examples of one of the other images that has issues.
Re: PAID : Help removing edge anti-aliasing when increasing canvas size
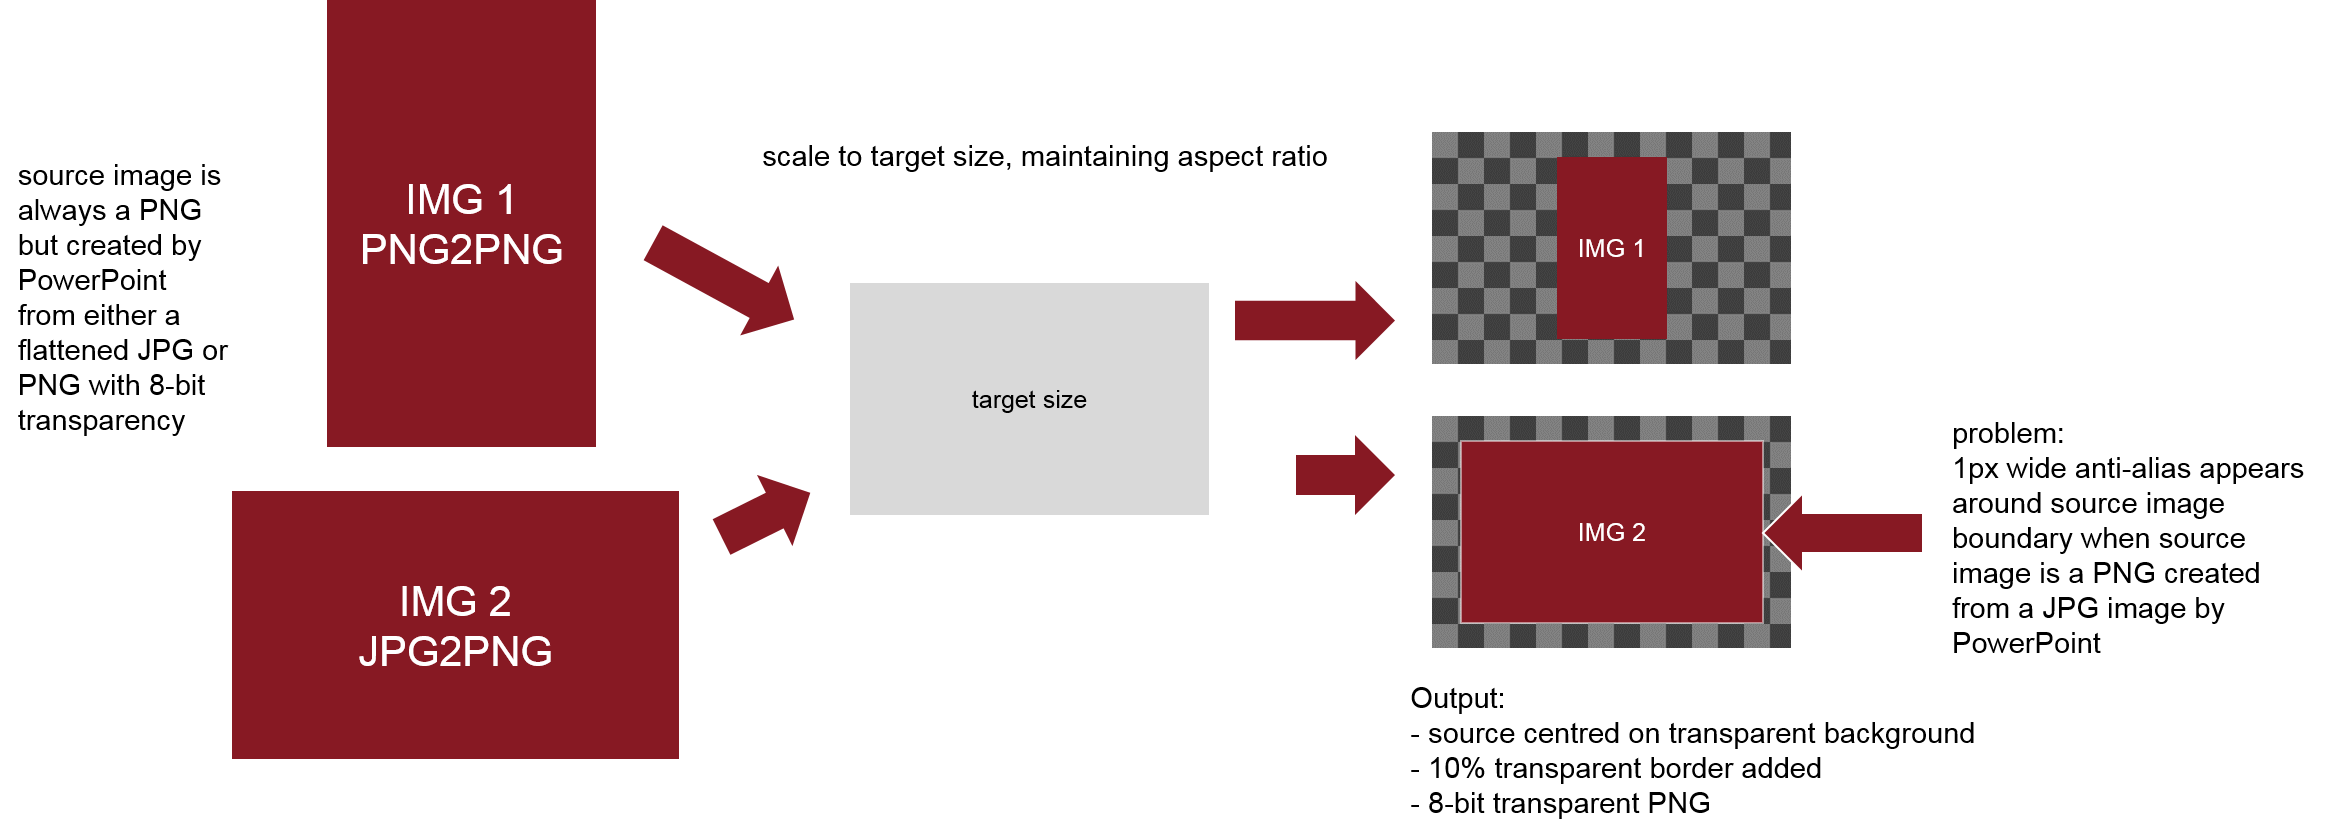
Thanks again fmw42. I tried the trim idea and it didn't yield the desired result. I think it will be useful to sketch what I'm trying to achieve as follows:
I'm starting to think that what I want to do isn't possible because it implies processing different source images in different ways. For example, if the original source image from PowerPoint was a PNG, apply anti-alias but if it was a flattened JPG, don't apply anti-alias. Not sure even if "anti-alias" is something that can be enabled/disabled or if that's your channel/threshold suggestion that effectively does that. I'm also not sure if it's possible to pre-analyse the two source PNG images in the example above (PPT-2000x2000-PNG.png and PPT-2000x2000-JPG.png) in order to branch accordingly in my batch code.
- fmw42
- Posts: 25562
- Joined: 2007-07-02T17:14:51-07:00
- Authentication code: 1152
- Location: Sunnyvale, California, USA
Re: PAID : Help removing edge anti-aliasing when increasing canvas size
Please provide the raw IMG 1 and IMG 2 and the target size.
Also is the 10% transparency just inside the border of your image or just outside it?
I do not understand the following. The issue is the 10% transparent border you want to put around the image before inserting it into the fully transparent background image of target size. That partial transparency is what is causing your dark line. I do not think you can add partial transparency and have your final software render that properly. It appears to be a limitation with your final software. The best you could do is put in the partial transparency and then flatten that against some background color (most likely your average border color).
Why are you converting JPG and PNG from Powerpoint to another PNG before creating the output PNG? Seems to me that you should just go from the Powerpoint image to the final image directly. Can you also provide the raw images directly from Powerpoint