Can this image be created with montage?

Questions and postings pertaining to the usage of ImageMagick regardless of the interface. This includes the command-line utilities, as well as the C and C++ APIs. Usage questions are like "How do I use ImageMagick to create drop shadows?".
Post Reply
Chemist116
Posts: 7
Joined: 2017-05-31T09:28:04-07:00
Authentication code: 1151

Can this image be created with montage?

Post by Chemist116 »

Hello. I am trying to do this work with imagemagick see below:

Image

However so far i was only able to do this:

Image

by using the code below

Code: Select all

montage apple_png12455.png prod_1485509212.jpg very_large_array_antenna.jpg -geometry 60x60+2+2 -background black work_05.jpg
so is it possible to do what is shown in the first example with montage tool on imagemagick?. Btw i am using windows version if possible any response can include a code that would work with my version of imagemagick. thanks in advance.
User avatar
fmw42
Posts: 25562
Joined: 2007-07-02T17:14:51-07:00
Authentication code: 1152
Location: Sunnyvale, California, USA

Re: Can this image be created with montage?

Post by fmw42 »

You can set a title for montage, but it will be one pointsize and cannot have the toaster icon added in the top left. I would suggest that you create the simple montage with the black background and use -geometry to add the space you want between images. Then make a larger black image and composite your montage result in it and add text to the top using -annotate for example and use composite to add the toaster icon in the top right. For a title see http://www.imagemagick.org/Usage/montage/#controls.
Chemist116
Posts: 7
Joined: 2017-05-31T09:28:04-07:00
Authentication code: 1151

Re: Can this image be created with montage?

Post by Chemist116 »

fmw42 wrote: 2017-06-02T10:49:34-07:00 You can set a title for montage, but it will be one pointsize and cannot have the toaster icon added in the top left. I would suggest that you create the simple montage with the black background and use -geometry to add the space you want between images. Then make a larger black image and composite your montage result in it and add text to the top using -annotate for example and use composite to add the toaster icon in the top right. For a title see http://www.imagemagick.org/Usage/montage/#controls.
I am having problem with the syntax of imagemagick for adjusting the size (preserving aspect ratio) and the borders. Can you be a little bit more descriptive on how to do it?. i have seen the examples but the only one which i was able to make it to work was the presented image with the apple, toaster and the antenna in my first post. I understand what you meant by compositing two images but i dont know how to do this. I have to stress that the backslash thing in the examples is causing me tons of troubles in windows as it does not understand that argument so i omitted those but it does not work. Can you help me?. Thanks
Bonzo
Posts: 2971
Joined: 2006-05-20T08:08:19-07:00
Location: Cambridge, England

Re: Can this image be created with montage?

Post by Bonzo »

Personally I would go with convert/magick depending on your version but you need to supply more information:
Is the background always the same size, same text.
is the toaster in the same place although it might be a different image
Are there always six images although they may be different but will always be the same size
snibgo
Posts: 12159
Joined: 2010-01-23T23:01:33-07:00
Authentication code: 1151
Location: England, UK

Re: Can this image be created with montage?

Post by snibgo »

Chemist116: If you show your input images, we can more easily show you what you need for your required output.

There are many ways of making that output. If you only want it once, why not use Gimp? With ImageMagick, I might do it like this: a single "convert" or "magick", read the apple, add a border, duplicate and append, append another image with the text and toaster.

The examples on the official usage pages are for bash shells. For IM under Windows, see http://www.imagemagick.org/Usage/windows/ . Most scripts on my pages are for Windows BAT.
snibgo's IM pages: im.snibgo.com
Chemist116
Posts: 7
Joined: 2017-05-31T09:28:04-07:00
Authentication code: 1151

Re: Can this image be created with montage?

Post by Chemist116 »

snibgo wrote: 2017-06-02T13:07:35-07:00 Chemist116: If you show your input images, we can more easily show you what you need for your required output.

There are many ways of making that output. If you only want it once, why not use Gimp? With ImageMagick, I might do it like this: a single "convert" or "magick", read the apple, add a border, duplicate and append, append another image with the text and toaster.

The examples on the official usage pages are for bash shells. For IM under Windows, see http://www.imagemagick.org/Usage/windows/ . Most scripts on my pages are for Windows BAT.
Instead of the apple which is in the picture above i would like to use this image

Image

however i am stranded with the code -geometry on how to resize it such it fits let's say 250 pixels but maintaining its aspect ratio and to assemble a sequence of aq grid of 3 x2 images such as in a contact sheet. I know i could use gimp but i would like to avoid that process because i would need to repeat the same process for each group of images i would like to handle. And i understand imagemagick is great for this process. Anyway can you help me from here?.
snibgo
Posts: 12159
Joined: 2010-01-23T23:01:33-07:00
Authentication code: 1151
Location: England, UK

Re: Can this image be created with montage?

Post by snibgo »

What version IM are you using? This assumes v6. For v7, use "magick" instead of "convert". Windows BAT syntax.

Code: Select all

convert ^
  SBAcyNj.jpg ^
  -resize 250x250 ^
  -compose Copy -bordercolor Khaki -border 10 ^
  -duplicate 2 +append ^
  -duplicate 1 -append ^
  -border 10 ^
  sba_out.png
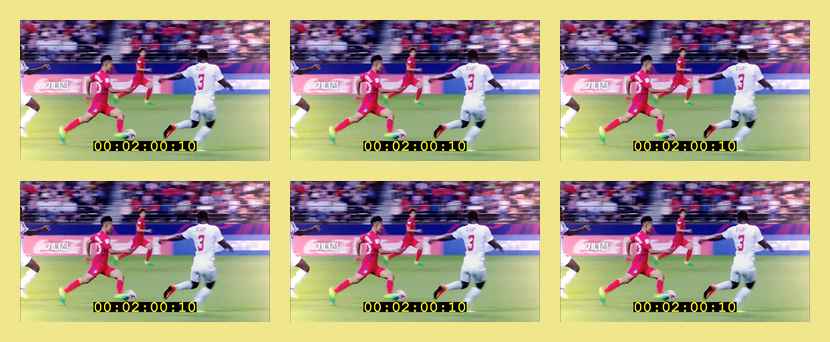
The command resizes the image to fit in a 250x250 box, adds a small border, makes 2 duplicates (so we have 3) and appends them sideways, duplicates that and appends them vertically, and adds another thin border to the overall image.
Image
(This is a low-quality JPEG, for internet speed.)
snibgo's IM pages: im.snibgo.com
User avatar
GeeMack
Posts: 718
Joined: 2015-12-01T22:09:46-07:00
Authentication code: 1151
Location: Central Illinois, USA

Re: Can this image be created with montage?

Post by GeeMack »

Chemist116 wrote: 2017-06-03T04:28:58-07:00however i am stranded with the code -geometry on how to resize it such it fits let's say 250 pixels but maintaining its aspect ratio and to assemble a sequence of aq grid of 3 x2 images such as in a contact sheet.
Use "convert" instead of "montage". First you should review the example snibgo provided above, then also maybe try a command like this to get you started...

Code: Select all

convert img1.jpg img2.jpg img3.jpg img4.jpg img5.jpg img6.jpg -resize 250x250 ^
   -bordercolor black -border 5 +append -crop 2x1@ -append -border 5 +repage output.jpg
Once you understand how those commands work for attaching your images side by side with "+append" and attaching them top to bottom using "-append", you'll be ready to add the operations to put a wide border at the top, add your text to that border, and composite your logo image in the corner. It can all be done in a single IM command, but it will probably be easier if you construct the command it a little at a time.
snibgo
Posts: 12159
Joined: 2010-01-23T23:01:33-07:00
Authentication code: 1151
Location: England, UK

Re: Can this image be created with montage?

Post by snibgo »

There are often many ways to do the same thing, and the most suitable may depend on what assumptions can be made.

GeeMack's code takes 6 images, resizes each and adds a border, and appends them sideways. Then it crops them into two equal-sized pieces and appends these vertically, adding another border.

That method is fine if the resized images are the same width, which they will be if they are all landscape format (wider than tall). However, if some are portrait format, cropping into two pieces will probably cut through one of the inputs.

So, another method is:

Code: Select all

convert ^
  -bordercolor black ^
  -gravity Center ^
  ( img1.jpg img2.jpg img3.jpg -resize 250x250 -border 5 +append ) ^
  ( img4.jpg img5.jpg img6.jpg -resize 250x250 -border 5 +append ) ^
  -append -border 5 +repage ^
  output.jpg
"-gravity center" makes a difference only when the images are different sizes.
snibgo's IM pages: im.snibgo.com
Post Reply