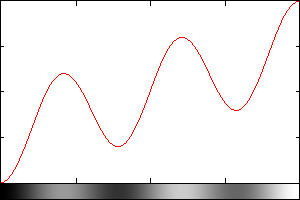
Are you on Linux/Mac or Window? If Linux/Mac, then you can use my script chrome (see below) to achieve that. The key is to create a lookup table like the one in the GIMP example that has several rising bumps. You can do that with my script curves to get the same kind of curve as in GIMP if you know the values. Otherwise, in Windows, you would have to create the look-up table using -fx from some formula that replicates something similar. Once you have the lookup table as a 1D image, you can them apply it to your image using -clut.
In my script chrome, I created the lookup table via -function sinusoid
Here is the core code
Input:

Create LUT:
amp1=0.5; amp2=0.5; cyc=2.5
convert \( -size 1x100 gradient: -rotate 90 \) \
\( -clone 0 -function sinusoid $cyc,-90,0.5,0.5 \) \
\( -clone 1 -evaluate multiply $amp1 \) \
\( -clone 0 -evaluate multiply $amp2 \) \
-delete 0,1 -compose plus -composite \
lut.png
Profile of LUT:

Process Image:
convert binaryimage.gif -colorspace gray -blur 0x3 \
-shade 135x45 -auto-level lut.png -clut binaryimage_result.png

For Windows users, leave off all \ and put ^ at the end of each line where the trailing \ is located. See
http://www.imagemagick.org/Usage/windows/
EDIT:
With a slight modification of the Process step (
as simplified from my chrome script at my link below), you can add color and a transparent background.
Color only:
color="lightblue"
convert binaryimage.gif -colorspace gray -blur 0x3 \
-shade 135x45 -auto-level lut.png -clut +level-colors black,${color} \
binaryimage_result3.png

Color and Transparency:
color="lightblue"
convert binaryimage.gif -colorspace gray -blur 0x3 \
-shade 135x45 -auto-level lut.png -clut +level-colors black,${color} \
-fuzz 5% -fill none -draw "color 0,0 floodfill" binaryimage_result2.png

Though masking would produce a better transparent result.
See snibgo's more complete solution below (though I believe it could be made faster by using -blur rather than -gaussian-blur with little visible effect).


