Page 1 of 2
Creating a cartoon effect
Posted: 2017-02-15T11:48:00-07:00
by Leekao
I'm trying to create a cartoonish effect using convert, after some digging online I found this helpful script (
http://www.fmwconcepts.com/imagemagick/cartoon/) which creates the following commands (my infile is '/img/14.jpg'):
convert -quiet /img/14.jpg +repage -depth 8 -selective-blur 0x5+10% /img/14.jpg.stg-1.mpc
convert /img/14.jpg.stg-1.mpc -level 0x60% -colorspace gray -posterize 6 -depth 8 -gamma 2.2 /img/14.jpg.stg-2.mpc
convert /img/14.jpg.stg-1.mpc ( /img/14.jpg.stg-2.mpc -blur 0x1 ) ( -clone 0 -clone 1 -compose over -compose multiply -composite -modulate 100,150,100 ) ( -clone 0 -colorspace gray ) ( -clone 3 -negate -blur 0x2 ) ( -clone 3 -clone 4 -compose over -compose colordodge -composite -evaluate pow 4 -threshold 90% -statistic median 3x3 ) -delete 0,1,3,4 -compose over -compose multiply -composite /img/14.out.jpg
Now, this works pretty well and gives me the effect I need, but it takes waaaay too long and way too much cpu intensive for me to use, is there some way to optimize it or break it into more commands and make it less cpu intense?
Any help or advice will be greatly appreciated.
Re: Creating a cartoon effect
Posted: 2017-02-15T12:05:47-07:00
by fmw42
See my toon script. It is simpler and one command line.
Unix syntax:
Code: Select all
convert input.jpg \
\( -clone 0 -blur 0x5 \) \
\( -clone 0 -fill black -colorize 100 \) \
\( -clone 0 -define convolve:scale='!' \
-define morphology:compose=Lighten \
-morphology Convolve  'Sobel:>' \
-negate -evaluate pow 5 -negate -level 30x100% \) \
-delete 0 -compose over -composite \
result.jpg
For Windows CMD replace \( ... \) with ( ... ) and change new line characters \ with ^
Re: Creating a cartoon effect
Posted: 2017-02-15T12:30:12-07:00
by snibgo
Looking at the OP script, in "-compose over -compose multiply" you set this setting, then change it, so the "-compose over" is redundant.
You can combine the three converts into one, with no intermediate files, which makes it quicker. Windows BAT syntax:
Code: Select all
%IM%convert ^
  %SRC% ^
  +repage -depth 8 -selective-blur 0x5+10%% ^
  ( -clone 0 ^
    -level 0x60%% -colorspace gray -posterize 6 -depth 8 -gamma 2.2 ^
    -blur 0x1 ) ^
  ( -clone 0 -clone 1 -compose multiply -composite ^
    -modulate 100,150,100 ) ^
  ( -clone 0 -colorspace gray ) ^
  ( -clone 3 -negate -blur 0x2 ) ^
  ( -clone 3 -clone 4 -compose colordodge -composite ^
    -evaluate pow 4 -threshold 90%% -statistic median 3x3 ) ^
  -delete 0,1,3,4 ^
  -compose multiply -composite ^
  out.jpg
Re: Creating a cartoon effect
Posted: 2017-02-15T14:10:02-07:00
by Leekao
fmw42 wrote: ↑2017-02-15T12:05:47-07:00
See my toon script. It is simpler and one command line.
Unix syntax:
Code: Select all
convert input.jpg \
\( -clone 0 -blur 0x5 \) \
\( -clone 0 -fill black -colorize 100 \) \
\( -clone 0 -define convolve:scale='!' \
-define morphology:compose=Lighten \
-morphology Convolve  'Sobel:>' \
-negate -evaluate pow 5 -negate -level 30x100% \) \
-delete 0 -compose over -composite \
result.jpg
For Windows CMD replace \( ... \) with ( ... ) and change new line characters \ with ^
doesn't work on my WIN10 with IM7.0.4-5 Q16 x64, this is the output:
convert /img/0.jpg ( -clone 0 -blur 0x5 ) ( -clone 0 -fill black -colorize 100 ) ( -clone 0 -define convolve:scale='!' -define morphology:compose=Lighten -morphology Convolve 'Sobel:-negate -evaluate pow 5 -negate -level 30x100 ) -delete 0 -compose over -composite /img/0.jpg-out.jpg 1>'
convert: invalid argument for option '-morphology': 'Sobel:-negate @ error/convert.c/ConvertImageCommand/2228.
Re: Creating a cartoon effect
Posted: 2017-02-15T14:12:05-07:00
by Leekao
snibgo wrote: ↑2017-02-15T12:30:12-07:00
Looking at the OP script, in "-compose over -compose multiply" you set this setting, then change it, so the "-compose over" is redundant.
You can combine the three converts into one, with no intermediate files, which makes it quicker. Windows BAT syntax:
Code: Select all
%IM%convert ^
  %SRC% ^
  +repage -depth 8 -selective-blur 0x5+10%% ^
  ( -clone 0 ^
    -level 0x60%% -colorspace gray -posterize 6 -depth 8 -gamma 2.2 ^
    -blur 0x1 ) ^
  ( -clone 0 -clone 1 -compose multiply -composite ^
    -modulate 100,150,100 ) ^
  ( -clone 0 -colorspace gray ) ^
  ( -clone 3 -negate -blur 0x2 ) ^
  ( -clone 3 -clone 4 -compose colordodge -composite ^
    -evaluate pow 4 -threshold 90%% -statistic median 3x3 ) ^
  -delete 0,1,3,4 ^
  -compose multiply -composite ^
  out.jpg
Thank you so much, that's really great and it is faster but still very cpu intense, I would rather do 20 commands for the same result and have them each run quicker if possible.
Re: Creating a cartoon effect
Posted: 2017-02-15T14:24:33-07:00
by fmw42
Code: Select all
doesn't work on my WIN10 with IM7.0.4-5 Q16 x64
You need to convert my unix syntax to windows and to use magick rather than convert.
Try
Code: Select all
convert input.jpg ^
( -clone 0 -blur 0x5 ) ^
( -clone 0 -fill black -colorize 100 ) ^
( -clone 0 -define convolve:scale='!' ^
-define morphology:compose=Lighten ^
-morphology Convolve  'Sobel:>' ^
-negate -evaluate pow 5 -negate -level 30x100% ) ^
-delete 0 -compose over -composite ^
result.jpg
Note the line ending ^ are important or remove them all as one long line. If in a .bat file, then you must change % to %%
Re: Creating a cartoon effect
Posted: 2017-02-15T15:06:11-07:00
by Leekao
fmw42 wrote: ↑2017-02-15T14:24:33-07:00
Code: Select all
doesn't work on my WIN10 with IM7.0.4-5 Q16 x64
You need to convert my unix syntax to windows and to use magick rather than convert.
Try
Code: Select all
convert input.jpg ^
( -clone 0 -blur 0x5 ) ^
( -clone 0 -fill black -colorize 100 ) ^
( -clone 0 -define convolve:scale='!' ^
-define morphology:compose=Lighten ^
-morphology Convolve  'Sobel:>' ^
-negate -evaluate pow 5 -negate -level 30x100% ) ^
-delete 0 -compose over -composite ^
result.jpg
Note the line ending ^ are important or remove them all as one long line. If in a .bat file, then you must change % to %%
I converted the unix syntax before my last post, I still get the same error, I tried copying your command into a bat file and got same error, tried changing the % to %%, still same error:
invalid argument for option '-morphology': 'Sobel:-negate @ error/convert.c/ConvertImageCommand/2228.
Re: Creating a cartoon effect
Posted: 2017-02-15T16:04:02-07:00
by fmw42
Are you on a very old version of IM. -morphology has been around for a very long time now. What is your IM version?
Try changing my single quotes to double quotes. I think Windows does not like single quotes.
'Sobel:>' ---> "Sobel:>"
As I am not a Windows user, perhaps you can refer to
http://www.imagemagick.org/Usage/windows/ for conversion issues.
Re: Creating a cartoon effect
Posted: 2017-02-15T16:37:03-07:00
by Leekao
fmw42 wrote: ↑2017-02-15T16:04:02-07:00
Are you on a very old version of IM. -morphology has been around for a very long time now. What is your IM version?
Try changing my single quotes to double quotes. I think Windows does not like single quotes.
'Sobel:>' ---> "Sobel:>"
As I am not a Windows user, perhaps you can refer to
http://www.imagemagick.org/Usage/windows/ for conversion issues.
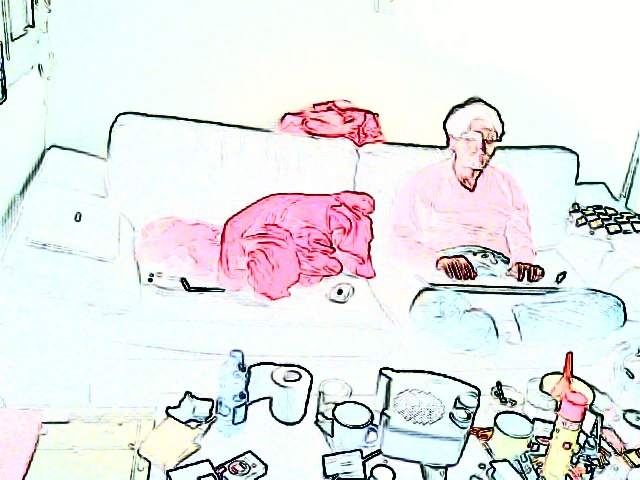
You nailed it, changing the quotes around "Sobel" and around the scale did the trick. the command runs very fast which is great but the effect however is not quite what i hoped for:

Re: Creating a cartoon effect
Posted: 2017-02-15T16:38:56-07:00
by fmw42
An alternative with an excellent cartoon can be achieve with OpenCV. See
http://www.inf.ufrgs.br/~eslgastal/Doma ... nsform.pdf
http://www.learnopencv.com/non-photorea ... -python-c/ (see stylization result at bottom)
Re: Creating a cartoon effect
Posted: 2017-02-15T16:39:44-07:00
by fmw42
You do not show the input image. It works best for slowly varying images, such as a face. See my toon script for examples.
Re: Creating a cartoon effect
Posted: 2017-02-15T16:42:41-07:00
by fmw42
See also my scripts, sketch and sketcher.
Re: Creating a cartoon effect
Posted: 2017-02-15T16:52:41-07:00
by Leekao
fmw42 wrote: ↑2017-02-15T16:39:44-07:00
You do not show the input image. It works best for slowly varying images, such as a face. See my toon script for examples.
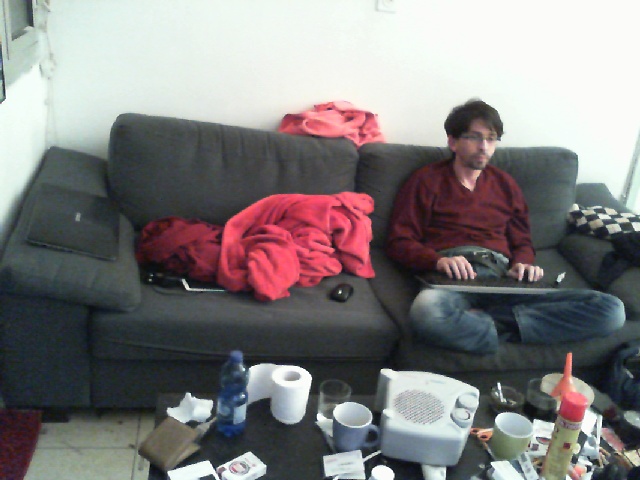
the input file is:

(it's me, sitting in my living room, hello there!)
I have seen your examples (the commands from my original post are the result of your "cartoonize" script and I linked to your site from the post), I liked your toon effect alot and I was actually trying to achieve the same result you get with "-m 1" but couldn't accomplish it.
Re: Creating a cartoon effect
Posted: 2017-02-15T17:00:42-07:00
by fmw42
This is what I get:
Input:

Code: Select all
toon -m 1 -g 5 -b 5 -S 10 -s 200 pNgAaeB.jpg pNgAaeB_toon_m1_g5_b5_S10_s200.jpg
\

Re: Creating a cartoon effect
Posted: 2017-02-15T17:06:16-07:00
by Leekao
And just in case you're wondering what I'm doing, I'd love to share it, just ignore this post if you don't care about it.
What I did is I took a tablet, put a nice wooden picture frame around it, hooked it up to a webcam and a raspberry pie and the tablet is playing what the camera recorded with an hour delay. so basically when I'm sitting in my living room on my wall there is a frame that shows my living room an hour ago.
I called it "TimeFrame".
While I was perfectly happy to live with this on my wall, some of my friends (specially weman) protested and claimed it made them self conscious, so instead of recording video I started taking snapshots at 30fps and I'm running all the frames through imagemagick to make em cartoonish and then playing them in 30fps, that's why it's important to me that the convert will run fast and be cpu-minded.
I wrote it all in coffescript and I run it on node7, npm actually have a library for imagemagick (and graphicmagick) (
https://github.com/aheckmann/gm) and I got some pretty good results using it, but some of the more complex commands are hard (for me at least) to write in that library, so I run it command line.
this is what I tried in code (coffeescript), perhaps you'll think of something I didn't:
convert = (filename, cb) ->
img_path = "/img/#{filename}.jpg"
gm(img_path)
.negative()
.despeckle()
.despeckle()
.edge(2)
.negative()
.write img_path, cb
this set-up gave this effect, which is kinda nice, but I hate that I'm losing almost all the colors:


